

Description
The Easy Financial Planner: Your Money GPS
Short Version Setup Outline
It is recommended that you start with the User Manual to gain valuable information before getting started. After reading the Introduction, use these instructions if you are familiar with MS Excel or similar software and want to get started quickly. These instructions are a short version of what’s in the User Manual, Section 2: Initial Setup, and in some cases other places in the User Manual.
If you get stuck, refer to the User Manual section that further explains what you are doing in the EFP, visit the Support page on our website, or contact me on the Contact page. Also see the Contents, Glossary, or Index, at the end of the User Manual, to find the help you need. If all fail, please contact me via the Contact page on the website.
Note: The User Manual is dynamic with hyperlinks on the Contents page. Hold down Crtl (Control key), then click on the line of the topic you wish to read about. You will be taken to that page, instead of long scrolling. Refer to the User Manual, as needed, to accomplish the steps below.
- Gather your document and thoughts
- Create 3 name lists (names should be 12 character or less, ALL CAPS, recommended)
- Names for your current or potential income sources (this includes a name for your job, overdraft protection account, or any account or business that deposit or refund money to your checking account.
- Names for your Living expenses & Debts (scheduled expenses have due date and or amount or expenses you wish to record in Living expense area. See User Manual for more information
- Names for your Misc. Expenses. (Unscheduled expenses such as groceries, auto fuel, cash withdrawal, fast food, etc.)
- Setup the Name Manager, with the lists you created
- Complete the Profile. You can select most names used there, from the Name Manager.
- Profile is mostly self-explanatory, but if you need help, see User Manual, Special Instructions or the Index.
- Set the Calendar (Option 1) to the plan year (this is the first step of creating your annual plan).
- Select & Transfer Pay Dates using (Option 2 & 3) and Transfer button.
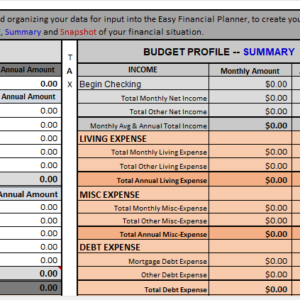
- Enter Beginning Checking Balance (estimated) on January Budget, Income Section, on budget side only.
- Complete the following on the January budget only. Later you’ll click buttons to fill all other budgets.
- Select Income name, pay period and enter amount for each Pay Date. Do not enter “Other Income” yet.
- Select Living Expense names, enter Due Dates (in order) and amounts. Do not enter “Other Living Expense” yet.
- Select “SPENDING” name in Misc. Expense section. Enter Due Date as “1/28/XX” (XX is the last two of year) and enter basic Spending amount from Profile. Do not enter “Other Misc. Expense”, yet.
- Distribute Incomes, Living Expenses and Misc. Expense to all other budgets. Click the big white button with blue text at top of section. Do not click this button in Mortgage and Debt Section, yet.
- Return to January Budget, enter Other Incomes, enter Other Living Expense, Enter Other Misc. Expenses.
- The following steps are for setting up your “primary” mortgage debt and your “other” non-mortgage debts. This will cause names to appear, on the budgets, in the Mortgage and Debts Section, below the Living Expense Section.
- Setup Your Mortgage (this is your primary debt) in the Mortgage Amortization Schedule 1. Copy data from Profile
- Setup Monthly Escrow Register. Enter current or data for plan year.
- Calculate Interest and Time Saving (optional—you can use this later, if you make extra principal payment on your mortgage.
- Setup Your “Other” Debts (auto loans, credit cards, store cards, etc.)
- Setup Debt accounts (in Due Date order, as on Profile) in the Debt Registers (Debt 1, Debt 2, Debt 3…Debt 12), by selecting a name and entering account details.
- If you have set up all debts account in Due Date order, they should appear in the same order on the Profile and on the budgets Mortgage and Debt Sections. Starting balances should have transferred from the Profile to the Monthly Debt Summary, and other data to the Debt Transaction Summary. Ensure the name you select for Debt 1 register match Debt Register, line 1 in the Profile. And so on…
- Verify Debts Beginning Balance (currently estimates, but update these on January 1st in Profile.
- Enter Debt Expense Due Dates and Minimum Payment amount on budgets. (Enter amount on Budget side only)
- Setup Debt Account Minimum Payments in the Debt Register (a few sample entries are in Debt 1 register.)
- Distribute Due Date and Budget side amount to all other budgets.
- Review Income, Living Expense, Misc. Expense, and Mortgage/Debt Expenses. Ensure each has a name, due date and budget side amount.
- Allocate Savings, as you have indicated on Profile (see User Manual)
- Inventory and identify your personal property.
- Update your Account Balances
- Calculate and Record Your Beginning Net Worth.
- End of instructions; you are ready to use Traditional Recording
- Complete these steps to use Perpetual Recording (recommended)
- Execute EFP Daily Management and Maintenance routines. (See User Manual: Section 3)
Reviews
There are no reviews yet.